This week it came to attention two new possible actions to buttons created using list formatting:
- setValue: Updates a field value
- openContextMenu: Displays the default context menu for the list item
With the first one, we can update the values of any field in the list item. And update multiple field values with a single click.
Not only this but we can use dynamic values and do calculations using the JSON formatting formulas, for example, we could increment/decrement a number value by clicking a custom button created with JSON formatting.
With that in mind, after seeing some samples on Twitter published by @techan_k, I thought this could be useful for approvals scenarios. For example, we can update the item status and who approved the item with a single click, so as in the example below:
The structure behind the example
Three list columns are needed:
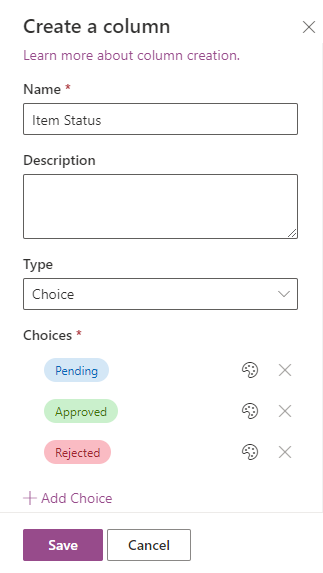
- A Choice column for the status (Suggested name: ‘Item Status’), with the possible values: Pending, Approved, Rejected. The standard configurable formatting for the Choice column can do the trick as below:
- A user field to register who approved or rejected the item (Suggested name ‘Approval Action By’)
- A dummy field to add the JSON template and display the buttons separately. The suggestion is to add a calculated field named ‘Approval‘.
The logic behind the sample
To make the functionality cleaner, the buttons would need to be displayed only when the items have not been approved. So we simply set the CSS display property to ‘none‘ when the status is not empty and is different than ‘Pending‘. And display a text message stating that the item was already approved or rejected.
On each button, we set as the customRowAction, an action using the new setField action, and pass two fields on each by using their internal names. Note that to set the current user as the value, we simply pass the @me formula.
Approval:
"customRowAction": {
              "action": "setValue",
              "actionInput": {
                "ItemStatus": "Approved",
                "ApprovalActionBy": "@me"
              }
}
Rejection:
"customRowAction": {
              "action": "setValue",
              "actionInput": {
                "ItemStatus": "Rejected",
                "ApprovalActionBy": "@me"
              }
}
Full sample
To add this to any SharePoint list, create the columns as stated above, and add the following JSON template to the Approval field (resize it to get the buttons to be displayed horizontally/vertically as you wish). Tweak the internal names as needed in case your list uses different field names:
{
  "$schema": "https://developer.microsoft.com/json-schemas/sp/column-formatting.schema.json",
  "elmType": "div",
  "style": {
    "flex-directon": "row",
    "justify-content": "left",
    "align-items": "center",
    "flex-wrap": "nowrap"
  },
  "children": [
    {
      "elmType": "div",
      "style": {
        "display": "=if([$ItemStatus] == 'Pending' || [$ItemStatus] == '', 'inherit','none')",
        "flex-directon": "row",
        "justify-content": "left",
        "align-items": "center",
        "flex-wrap": "wrap"
      },
      "children": [
        {
          "elmType": "button",
          "customRowAction": {
            "action": "setValue",
            "actionInput": {
              "ItemStatus": "Approved",
              "ApprovalActionBy": "@me"
            }
          },
          "attributes": {
            "class": "ms-fontColor-themePrimary ms-fontColor-themeDarker--hover"
          },
          "style": {
            "border": "none",
            "background-color": "transparent",
            "cursor": "pointer",
            "display": "flex",
            "flex-directon": "row",
            "justify-content": "left",
            "align-items": "center",
            "flex-wrap": "wrap"
          },
          "children": [
            {
              "elmType": "span",
              "attributes": {
                "iconName": "SkypeCircleCheck"
              },
              "style": {
                "padding": "4px"
              }
            },
            {
              "elmType": "span",
              "txtContent": "Approve",
              "style": {
                "word-break": "keep-all"
              }
            }
          ]
        },
        {
          "elmType": "button",
          "customRowAction": {
            "action": "setValue",
            "actionInput": {
              "ItemStatus": "Rejected",
              "ApprovalActionBy": "@me"
            }
          },
          "attributes": {
            "class": "ms-fontColor-themePrimary ms-fontColor-themeDarker--hover"
          },
          "style": {
            "border": "none",
            "background-color": "transparent",
            "cursor": "pointer",
            "display": "flex",
            "flex-directon": "row",
            "justify-content": "left",
            "align-items": "center",
            "flex-wrap": "wrap"
          },
          "children": [
            {
              "elmType": "span",
              "attributes": {
                "iconName": "Blocked"
              },
              "style": {
                "padding": "4px"
              }
            },
            {
              "elmType": "span",
              "txtContent": "Reject",
              "style": {
                "word-break": "keep-all"
              }
            }
          ]
        }
      ]
    },
    {
      "elmType": "div",
      "children": [
        {
          "elmType": "span",
          "txtContent": "='This item is ' + toLowerCase([$ItemStatus])",
          "style": {
            "display": "=if([$ItemStatus] == 'Pending' ||[$ItemStatus] == '' , 'none','inherit')",
            "padding-left": "5px",
            "word-break": "keep-all"
          }
        }
      ]
    }
  ]
}
Conclusion
By using list formatting and the new setValue action, we can now update field values, expanding a lot the possibilities of what can be done in SharePoint/Microsoft Lists without the need of the SharePoint Framework field customizers or other techniques (calling a Flow for example). This example is just a simple one to show how to update two fields at the same time and use the native formulas as values, but the possibilities now have expanded massively.
Note: For this approach to work correctly, all fields used in the JSON template need to be added to the list view where the custom buttons will be added.
[…] Tetsuya and Michel shared some great examples of a new option in List formatting. You can now use a setValue action […]
Great post!
I’m tried and worked for me following your instructions. Now I’ll try to add the approval/denial date to the list.
Thank you!
[…] https://michelcarlo.com/2021/11/19/quick-sharepoint-approvals-using-list-formatting-to-set-field-val… […]
Is this GA? Can´t use setValue since it´s not allowed ?
I think so as it is on the official documentation. Also, I’ve just tried it on a tenant using Standard Release and it works fine. What error do you get?
How would you replicate this similar functionality through a like/unlike functionality?
Hi Trevor, I created another example recently…this is similar but it’s like/dislike with an unique reaction per item. You can easily ajust it to make it become like/unlike: https://michelcarlo.com/2021/11/28/custom-like-dislike-functionality-using-sharepoint-list-formatting/
Hi Michel,
I tried using your solution for a multiuser approval, also adding the possibility via a second button to delete the choice done by the user and return to Approve/reject status. The only issue I am finding is that using the operation “removeFrom” I am not able to remove the @me from the user array. Any thoughts?
Thanks for this magnificent use case.
Thank you,
Davide
Hi Davide,
No worries, great it’s useful.
Have a look on another post I wrote, this case is for likes/dislikes but the idea from removing a like or dislike applies to your case:
https://michelcarlo.com/2021/11/28/custom-like-dislike-functionality-using-sharepoint-list-formatting/
Hi,
When the item is “Rejected”, is it possible to show the comments field to put some description which is required field?. Please let me know this can be accomplish?
Hi Surya, you can use the ‘InlineEditField’ property to display a comments field when a button is clicked:
https://docs.microsoft.com/en-us/sharepoint/dev/declarative-customization/formatting-syntax-reference
However, currently there is no alternative to make it required.
Hi Michel,
Please. help with issue below.
After I click Approved or Rejected – only one fileld is changing: ApprovalActionBy.
Other fields are not changing.
Any suggestions?
Hi Anton, are all the fields added to the view?
Hello,
I am having the same problem.
After I click Approved or Rejected – only one fileld is changing: ApprovalActionBy.
Other fields are not changing.
Any suggestions?
Hello Shawn,
What is the internal name of your status field? If it differs from this code it won’t work.
Solved this issue)
Great, what was the problem?
Hi Michel,
Thank you for the awesome post.
I managed to make it in the list view. and also tried it a gallery view. However the buttons no longer work.
Could you please advise? Thank you.
Hi Celine,
Have you added all the required fields to your gallery view?
What is the approval calculated off of? I am confused as I left the formula blank and SPO will not allow it be blank…Do I need to create an approval and rejection column…?
It’s a dummy calculated column only to show the buttons (and not to be displayed in edit forms).
You can add it with a simple formula as: = “APPROVAL”, just to be able to add it, and then it will be used only to render the buttons.
Hello!
Short question:
Where do I have to insert your Code?
In the Formula of the Column “Approval” or in the Column Formatting?
This function would really help us in the project!
Thank you!
its working now! One more question: if I open the List in my app I can’t click on approved or rejected.
Is there a way to implement the same function in the app?
Thank you!!
Do you mean the SharePoint mobile app?
Hi Max, you have to add the code to the Column formatting, not to the formula…
In the formula value you can add any dummy value as it will be hidden by the JSON formatting…
Hello Nice Work!! Can we do something like this for content approval for submitted items? Like have a button to approve or reject the item? or to popup the form to approved or reject the item?
Thank you in advanced
Hi Obed, yes you can…This is sample is just to demonstrate the capability, but you can use different statuses…
And also you can add a button to open the item in a Form…what do you need to do exactly?
This has the potential to solve a huge problem for me! Buttons are available and my approved by column is populating correctly. However, I am unable to get the choices in the Item Status column to appear and when I select approve/reject, the text message does not populate. I think this may be because I have not set the customRowAction for Approve/Reject? Can you clarify where that code should be inserted?
Hi Melissa, not sure if I understood your problem…You need to use the customRowAction, otherwise nothing will happen (field is not updated)…How did you use the JSON template exactly?
[…] the community are creating several solutions or use cases, including myself in the two samples: Quick Approvals and […]
[…] https://michelcarlo.com/2021/11/19/quick-sharepoint-approvals-using-list-formatting-to-set-field-val… […]
Does it have to use a button? What if I wanted it to just update a column based on a value that already exists in another column? Thx
Do you mean when you change a value in this column update another? If so you would need to use a custom form built with Power Apps or a Power Automate flow. The setValue option in list formating works when called from clicks on custom elements in the view/button formatter.
Thanks. That’s what I figured, wanted to make sure I wasn’t missing something.
How do you change an Items Status from Approved to Rejected or Back to Pending once the approval button has been already been selected. Example, I am the approver and after selecting Approved I realize that I need to reject instead and now I want to change the status to rejected. Thanks!
Some tweak would need to be done here, to always show the buttons. The logic above hides them after the status is changed.
See this sample below (it is the same as above but the buttons are never hidden):
https://github.com/michelcarlo/blogsamples/blob/main/QuickApprovals-NeverHideButtons/QuickApproval-NeverHideButtons.json
This is an awesome topic and very applicable to a project that I am currently working on. I was able to recreate this and it works fine. I have 0-10 experience with JS or JSON. I am trying to add two more choice buttons “Initiate” and “Re-think” I dissected the code and added the two extra “children” in thee but they did not show up. I believe it’s something near the bottom of the code that I need to duplicate but can’t quite figure it out. Is this something you can assist me with? Also, I have never responded to one of these posts with issues because I am not sure what the proper etiquette of doing so entails.
Hi Lance,
Thank you for your feedback.
You can send me your JSON content in the comments (good so more people see the responses) or as a message on Twitter or LinkedIn if you prefer, so I can have a look and help you.
Is there a way to make it work on premise ?
Hi there,
Not yet, for SharePoint on premises there is still no support for the setValue operator…
Will this not work if my column name has a number in it?
I have to submit documents for 2 reviews, and I am using “1st Reviewer Status” and “2nd Reviewer Status” as the column names, but the above code will not populate the approved/rejected in that column. I modified the columns to “Reviewer One Status” and “Reviewer Two Status” and the code worked fine. But spelling out the values doesn’t look as clean, in my opinion.
The problem is that list formatting uses the internal name for the columns. When creating it from the modern UI not all internal names are intuitive, especially with numbers and special characters.
You can find the correct internal name for the column by accessing the ‘List Settings’ menu, then opening the column settings.
You will see something like this in the browser URL after loading the Column Settings: /_layouts/15/FldEdit.aspx?List=%7BD436EDB0-7828-439E-9C2C-8CB6084F0B8F%7D&Field=_x0031_stReviewerStatus
Note that you have at the end: Field=_x0031_stReviewerStatus, meaning that your field internal ID will be _x0031_stReviewerStatus on this case.
So basically, grab the internal field names from there and use them wherever you need in the Formatting JSON.
Hi! Thank you very much for this.
It worked for me but I just have a problem.
I changed a few properties to make the “Approve” and “Reject” appear as a button. It updates the record but the buttons and the txtcontent are always visible.
How do I make the buttons disappear after being pressed and have the txtcontent appear only when the buttons are pressed?
Hello, can you send me the source JSON so I can have a look? Message me on Twitter or LinkedIn if you prefer.
[…] sent by a reader recently, on my Quick SharePoint Approvals using list formatting JSON to set field values formatting […]
Hi Michel, Thanks for the sample code, it works great.
I am looking to lock the “Approval action by” column to prevent anyone from changing the approvers name once it’s been entered. Is there any way to do this?
Hello Thomas,
I recommend you do two actions:
Disable the quick edit view
Hide the ‘Approval Action By’ field from the forms.
That will make it trickier for someone to change those fields.
Another solution would be to run a Power Automate flow on the background and change the permissions of the item to be Read Only, so no one can edit it.
Hi Michel! I am using your code and everything works fine but the approve/reject button doesn’t change to “This item was approved/rejected” after clicking on it. Do you know what could be a reason?
Hey Nica, I suggest you check the internal name of your fields. Maybe they differ from my code…
Hi Michel
I am looking forward to use the same code for Approval Status (Version Approval) which applies after implementing version control. I have replaced the [$IdeaStatus] with Internal name of “Approval Status” column [$_ModerationStatus] . I have used the exact same code, since Approval Status field is not a Choice type field, it’s sharepoint’s built-in field, the status int his column doesn’t get changed, however “Approval Action By” still works. Would have an idea of how we can set the Approval Status Column via this method. This post is really useful and Thanks in Advance for your help.
Hey Amit, I believe the Approval Status OOB field that comes with enabling version control cannot be modified with JSON formatting, that is the reason…