List view formatting in combination with the out-of-the-box list WebParts can be very powerful, enabling us to create very nice page experiences.
It is possible to render a view that uses view formatting in the list WebParts, and also at the same time use the dynamic filter feature to filter content on a WebPart based on the selection from another WebPart on the same page.
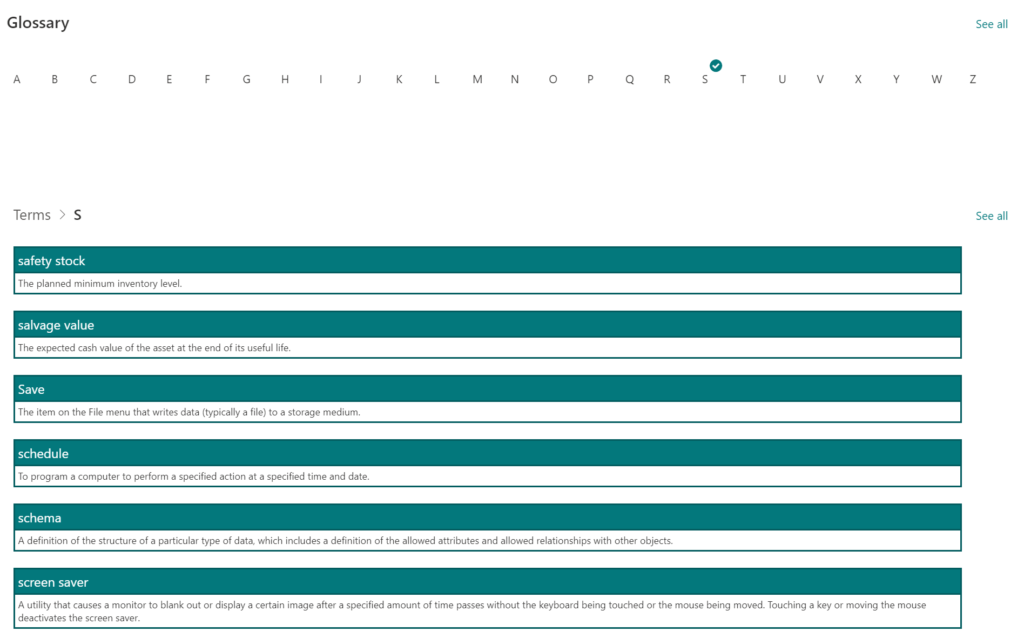
In this blog post, I will show a simple example where we can combine connected WebParts and List View formatting to build a Glossary page like the example below:

To build this example, two lists will be needed:
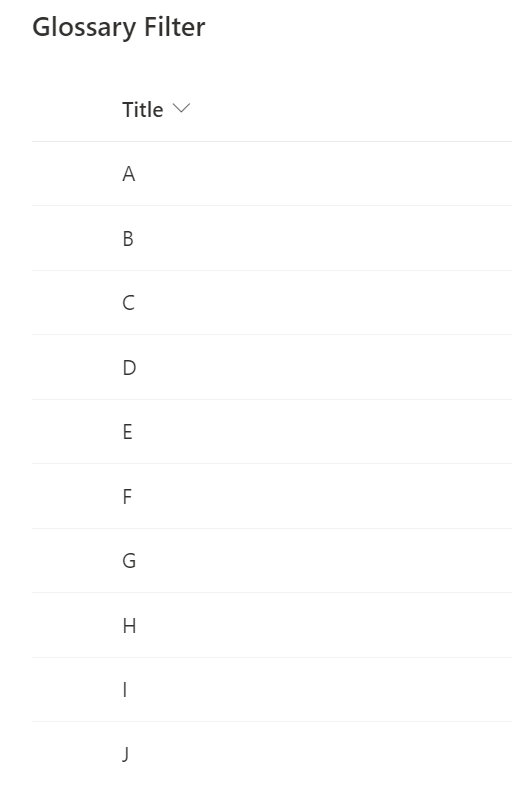
List 1: Glossary Filter
This list will use only the default Title field. In this list we need to store all the alphabet letters from A to Z (or your country language variation of the alphabet if preferred) to be used later as filters:

After the proper content is added to the list, create a new view as a Gallery view, and use the following JSON content to format it (select Format current view then Advanced mode):
{
  "$schema": "https://developer.microsoft.com/json-schemas/sp/v2/tile-formatting.schema.json",
  "height": 75,
  "width": 37,
  "hideSelection": false,
  "fillHorizontally": true,
  "formatter": {
    "elmType": "div",
    "children": [
      {
        "elmType": "div",
        "attributes": {
          "class": "ms-bgColor-white sp-css-borderColor-neutralLight"
        },
        "style": {
          "text-align": "left"
        },
        "children": [
          {
            "elmType": "div",
            "attributes": {
              "class": "sp-card-lastTextColumnContainer"
            },
            "style": {
              "text-align": "left"
            },
            "children": [
              {
                "elmType": "p",
                "attributes": {
                  "title": "[$Title]",
                  "class": "ms-fontColor-neutralPrimary ms-fontSize-11"
                },
                "txtContent": "=if ([$Title] == '', '–', [$Title])"
              }
            ]
          }
        ]
      }
    ]
  }
}
The new view will have the following look:


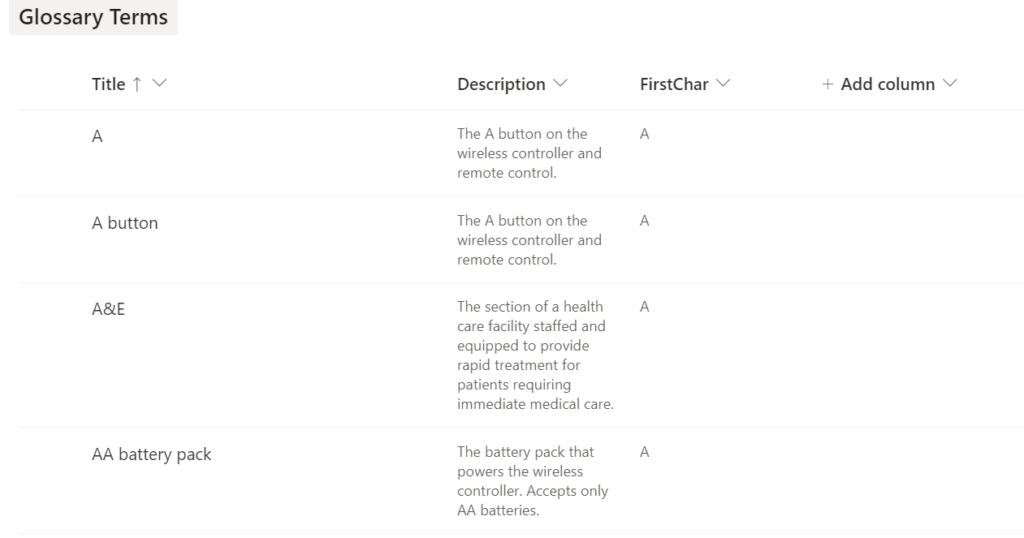
List 2: Glossary Terms
This is the list used to store all terms and its descriptions. This list will consist of 3 fields:
- Title – (default Title field) Single line of text field: used to store the term
- Description – Multiple lines of text field, no rich text enabled: Used to store the description
- FirstChar – Calculated field: To show the first character of the term. This will be the key for the whole functionality. Set it to use an output of ‘Single line of text’ and use as the formula: =LEFT(Title,1).
This will extract only the first character from the Title field and use it as the value.
When the fields are already set up, a new view is needed, to be formatted as the glossary view.
Create a view of type List. Edit the view and add the three fields, Title, Description and FirstChar field to it.
After the list is populated with some content you will notice the calculated field being properly updated:

Next, use the following JSON content as the view formatter:
{
  "$schema": "https://developer.microsoft.com/json-schemas/sp/view-formatting.schema.json",
  "hideListHeader": true,
  "hideSelection": true,
  "rowFormatter": {
    "elmType": "div",
    "style": {
      "display": "flex",
      "flex-direction": "column",
      "align-items": "flex-start"
    },
    "children": [
      {
        "elmType": "div",
        "attributes": {
          "class": "ms-bgColor-themePrimary ms-borderColor-themeDark ms-fontColor-white ms-fontSize-16"
        },
        "style": {
          "border-width": "2px",
          "border-style": "solid",
          "width": "95%",
          "padding": "4px"
        },
        "children": [
          {
            "elmType": "span",
            "txtContent": "[$Title]"
          }
        ]
      },
      {
        "elmType": "div",
        "attributes": {
          "class": "ms-borderColor-themeDark ms-fontSize-12"
        },
        "style": {
          "padding-left": "40px",
          "width": "95%",
          "border-width": "2px",
          "border-style": "solid",
          "padding": "4px",
          "border-top-width": "0",
          "margin-bottom": "20px"
        },
        "children": [
          {
            "elmType": "span",
            "txtContent": "[$Description]"
          }
        ]
      }
    ]
  }
}
To apply it, the process is similar to the first list, just select the ‘Format current view‘ option, choose ‘Advanced mode‘, and apply the JSON formatter.
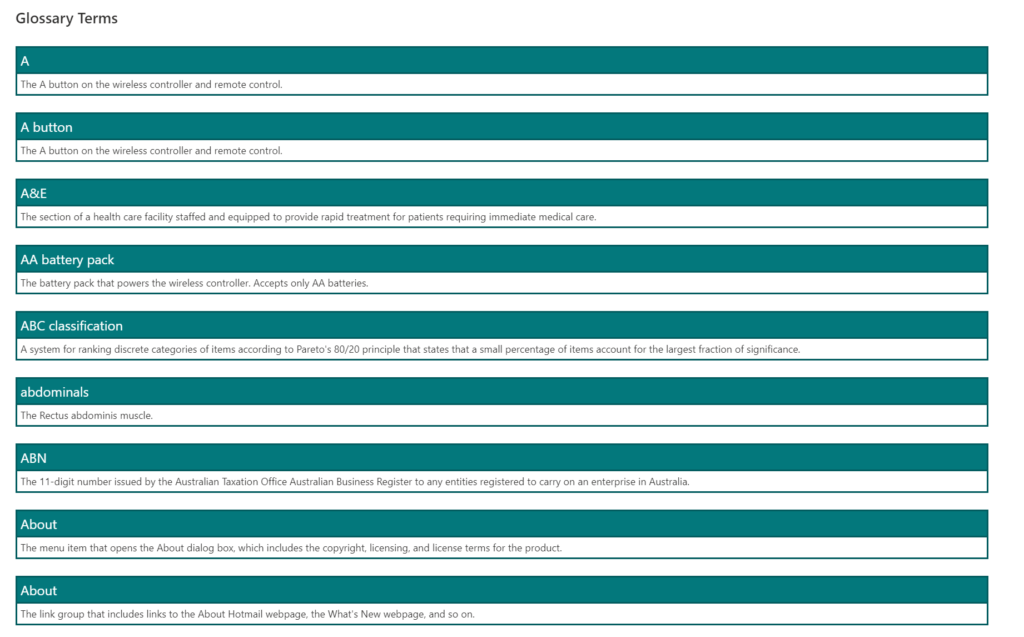
The following layout will apply to the view:

Creating and configuring the glossary page
Create a new blank page under your site and add a single column section.
On this section, add a first List WebPart for the Glossary Filter list and use the following settings for the WebPart (hide the command bar so only the view content is shown):

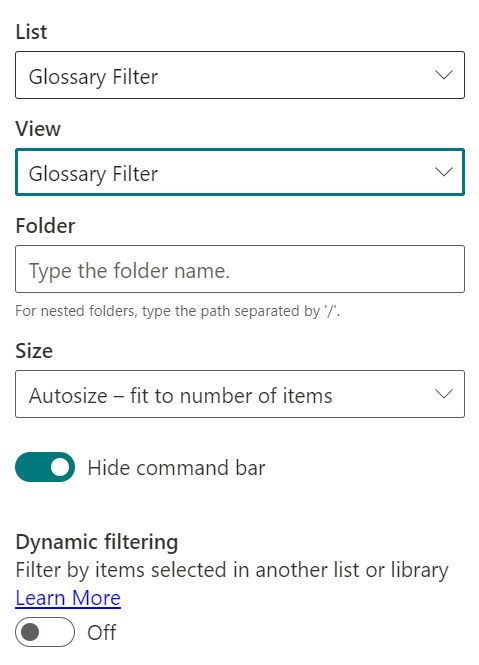
You should get the following layout for the WebPart, which has used a view with formatting:


Now add another list WebPart below it, but now select the Glossary Terms list, with the following settings (remember to hide the command bar so only the custom view will be shown):

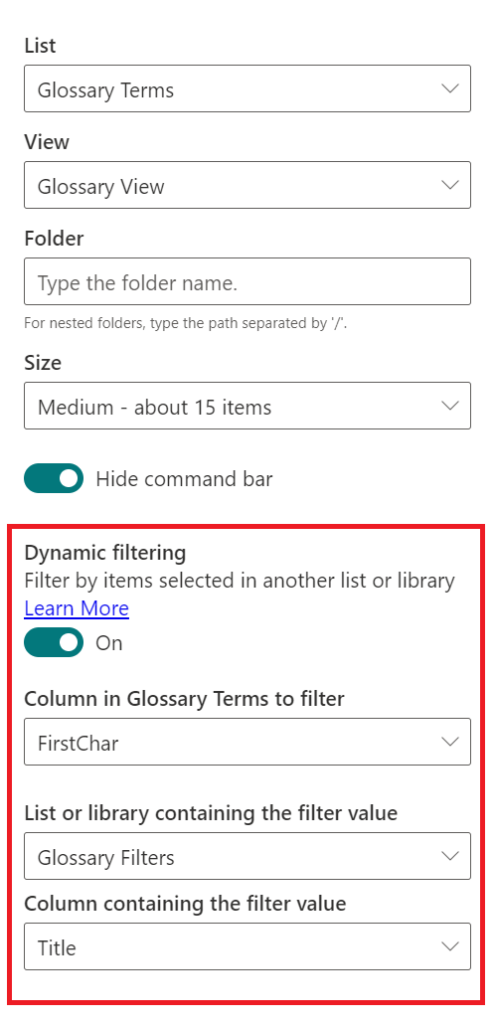
It is important to set up the dynamic filtering as above, as this is what will make the trick to filter the glossary view. When choosing the filters, select apply to preview the changes, save the change to view it working.
Also, a final touch to make the final page make more sense, edit the page and rename the WebParts on the page from:
- Glossary Terms to Terms
- Glossary Filters to Glossary
Save and publish your page to get the correct settings applied.
When selecting characters on the list view WebPart reading from the ‘Glossary Filters‘ list, the Glossary Terms will be properly filtered:

Conclusion
By using list sample view formatting in combination with dynamic filtering, we can create nice and reusable custom page experiences quickly.
References:
- Glossary content: Microsoft Terminology Collection
- JSON for Glossary view was adapted from the FAQ Sample from PnP GitHub Samples

[…] SharePoint glossary page using view formatting and connected list WebParts – michelcarlo […]
Thank you!! This was the most helpful article I could find after an hour trying to follow along other articles! Is it possible to also add a search bar where the term typed in brings up the glossary term?
In my glossary I have an extra column for ‘Team’ to categorize each term according to the team it belongs to. Would I be able to make that another filter?
Hi Nathan,
Thanks for the feedback!
You requirement is not possible to implement using the out-of-the-box WebParts, as at the moment the list view filter can be linked to only one list, but you can use the PnP Modern search WebParts (open source project) to create a page with your requirements:
https://microsoft-search.github.io/pnp-modern-search/
The layout for this page would have to be built using the search WebParts mentioned above, or a custom SharePoint Framework WebPart.
Hi Michel,
Simply amazing the templates! I am passionate about SharePoint site creation, but not a techie (actually I am an assistant in a large techie company 🙂 ) I used this one about Lists to create a glossary and it worked perfectly. Now I have just a little problem: besides the description I have another column with hyperlinks that has to be shown under the description, which is not happening. Any idea how I can solve the issue? Thanks a lot, also for the great content here and on Twitter!
Best,
Fabiane
Hey Fabiane,
Thanks for the feedback

What field type is your links column, is it a SharePoint link column? We would need to add it to the template, a small tweak will be needed.
Let me know so I may be able to send you an updated version…if you prefer send me a DM on twitter!
Best regards,
Michel
O my, I didn’t see that you answered so quickly! Thanks a lot, I will write on Twitter 🙂
Best,
Fabiane
Hello!! I am trying to do the same thing (extra column with a hyperlink for the source) could you post here? I don’t have twitter 🙁
Hey Angel,
I have created a short post adding this new version I shared with Fabiane:
https://michelcarlo.com/2022/04/30/glossary-view-formatting-json-template-including-related-link/
Let me know if this helps.
Great solution with excellent guide. Many thanks for sharing as have been searching for this for a while.
No worries, glad it helped you!
Hi Michel, this is great.
How can i change the color theme. to for example blue. i can change to darker etc as below but unable to change color completely
themeDarker
Hi Callum,
This solution gets the colours automatically from the current SharePoint site theme…
To use your custom colours, you could either edit the site theme, or instead of using the ‘class’ property in the elements’ attributes, use the style properties (which will creating your custom inline CSS styles)…
Oh wow, exactly what I was looking for.!!
So clear and simple. Thank youuu
No worries!

Amazing. When you load the page, by default it shows only items starting with A. Can it load all items and only filter once you start selecting letters from the Filter webpart? Thanks.
Hi Dessislav,
By default it lists all items when you load the page, isn’t it the case that your Glossary Items view is sorted by the Term values and by consequence they load the items starting with A first?
This is a great article. Good job!
Thanks for the feedback!

Hi Michel,
Thank you for the wonderful detailed article. Very helpful.
Wee query, is it possible to hide the “See all” link as when the viewers select that it takes them to the individual view and then some non-tech users are lost/stuck on what happened.
Many thanks.
Hi Nadim,
Unfortunately not, there is no supported way to hide this link at the moment. Hope there will be an option to configure this soon.
Hi is there a way I can use this with formatted rich text and images in my glossary? ps. thanks for creating this page!
Hi! No worries


Related to the rich text, unfortunately this is a current limitation of custom list formatting, so even if you use a Rich Text multiline field it won’t work… Hopefully it will be supported in the future
This is awesome! For some reason, my main view terms are not alphabetized; any thoughts as to why? I tried sorting the list A – Z but, when I go back to the view it’s not right.
Have you edited the view in SharePoint to sort the items? Click on edit view, change the sort order and save it?
Hi Michael,
Wonderful post!
I was able to follow your great instructions and have it working in a test environment.
I have two quick questions about the “Terms” view on the Page.
*Is there a way to tweak the view to be able to edit the list item by clicking on the title (i.e. if someone notices a typo or wants to add additional information)?
*Can we add a “Add Term” button where users can add easily additional glossary terms to the list?
1) Yes, here is a sample with this edit. You can add a dynamic link to open the item or a button that opens the edit form (this latest doesn’t seem to be supported from the list view WebPart by now, but works fine from the list):
Samples below:
With a link (replace ‘Glossary’ below by your current list path):
{
"$schema": "https://developer.microsoft.com/json-schemas/sp/view-formatting.schema.json",
"hideListHeader": true,
"hideSelection": true,
"rowFormatter": {
"elmType": "div",
"style": {
"display": "flex",
"flex-direction": "column",
"align-items": "flex-start"
},
"children": [
{
"elmType": "div",
"attributes": {
"class": "ms-bgColor-themePrimary ms-borderColor-themeDark ms-fontColor-white ms-fontSize-16"
},
"style": {
"border-width": "2px",
"border-style": "solid",
"width": "95%",
"padding": "4px"
},
"children": [
{
"elmType": "span",
"txtContent": "[$Title]"
}
]
},
{
"elmType": "div",
"attributes": {
"class": "ms-borderColor-themeDark ms-fontSize-12"
},
"style": {
"padding-left": "40px",
"width": "95%",
"border-width": "2px",
"border-style": "solid",
"padding": "4px",
"border-top-width": "0",
"margin-bottom": "20px"
},
"children": [
{
"elmType": "span",
"txtContent": "[$Description]"
},
{
"elmType": "a",
"attributes": {
"class": "ms-fontColor-themePrimary ms-fontColor-themeDarker–hover",
"target": "_blank",
"href": "=@currentWeb+’/Lists/Glossary/EditForm.aspx?ID=’+[$ID]"
},
"style": {
"border": "none",
"background-color": "transparent",
"cursor": "pointer"
},
"children": [
{
"elmType": "span",
"attributes": {
"iconName": "Edit"
},
"style": {
"padding-right": "6px"
}
},
{
"elmType": "span",
"txtContent": "Edit"
}
]
}
]
}
]
}
}
With an edit button:
{
"$schema": "https://developer.microsoft.com/json-schemas/sp/view-formatting.schema.json",
"hideListHeader": true,
"hideSelection": true,
"rowFormatter": {
"elmType": "div",
"style": {
"display": "flex",
"flex-direction": "column",
"align-items": "flex-start"
},
"children": [
{
"elmType": "div",
"attributes": {
"class": "ms-bgColor-themePrimary ms-borderColor-themeDark ms-fontColor-white ms-fontSize-16"
},
"style": {
"border-width": "2px",
"border-style": "solid",
"width": "95%",
"padding": "4px"
},
"children": [
{
"elmType": "span",
"txtContent": "[$Title]"
}
]
},
{
"elmType": "div",
"attributes": {
"class": "ms-borderColor-themeDark ms-fontSize-12"
},
"style": {
"padding-left": "40px",
"width": "95%",
"border-width": "2px",
"border-style": "solid",
"padding": "4px",
"border-top-width": "0",
"margin-bottom": "20px"
},
"children": [
{
"elmType": "span",
"txtContent": "[$Description]"
},
{
"elmType": "button",
"customRowAction": {
"action": "editProps"
},
"attributes": {
"class": "ms-fontColor-themePrimary ms-fontColor-themeDarker–hover"
},
"style": {
"border": "none",
"background-color": "transparent",
"cursor": "pointer"
},
"children": [
{
"elmType": "span",
"attributes": {
"iconName": "Edit"
},
"style": {
"padding-right": "6px"
}
},
{
"elmType": "span",
"txtContent": "Edit"
}
]
}
]
}
]
}
}
2) To Add the add term button, you can use the button WebPart. To get the link to add to this WebPart, open the new item form from the list, and click ‘Copy Link’ on the top right side.
Hi Michel,
I’m trying to copy the JSON content to SharePoint, but I got blank in the place of description, however, I already did all of those steps successfully on another list.
Thanks in advance
Hi Mostafa,
Is the internal name of the description field matching and the description field added to the view you added the JSON format?
Yes, and I make a double check by copying the name listed in the JSON format and pasting it into the description column, and the issue still exists.
Is the field added to your view too? You need to copy the internal name from your description column and add it to the JSON format listed…
Send me an example of how you are adding the JSON/your field name details so I can check. Make sure you add the field to the view.
* Yes, I have the same view, as the picture listed in your valuable article, and the description field is added but empty.
* The fields names are Title, Description, and FirstChar.
* I added the data from an excel sheet, then adding manually the 3rd field to pick the first letter.
and go to format current view –> Format view –> Choose layout is List –> Advanced mode then add the below code:
{
“$schema”: “https://developer.microsoft.com/json-schemas/sp/view-formatting.schema.json”,
“hideListHeader”: true,
“hideSelection”: true,
“rowFormatter”: {
“elmType”: “div”,
“style”: {
“display”: “flex”,
“flex-direction”: “column”,
“align-items”: “flex-start”
},
“children”: [
{
“elmType”: “div”,
“attributes”: {
“class”: “ms-bgColor-themePrimary ms-borderColor-themeDark ms-fontColor-white ms-fontSize-16”
},
“style”: {
“border-width”: “2px”,
“border-style”: “solid”,
“width”: “95%”,
“padding”: “4px”
},
“children”: [
{
“elmType”: “span”,
“txtContent”: “[$Title]”
}
]
},
{
“elmType”: “div”,
“attributes”: {
“class”: “ms-borderColor-themeDark ms-fontSize-12”
},
“style”: {
“padding-left”: “40px”,
“width”: “95%”,
“border-width”: “2px”,
“border-style”: “solid”,
“padding”: “4px”,
“border-top-width”: “0”,
“margin-bottom”: “20px”
},
“children”: [
{
“elmType”: “span”,
“txtContent”: “[$Description]”
}
]
}
]
}
}
Hi Mostafa,
Checking your response. If you created a list from Excel the internal name might be different than the display name.
To check the exact internal name, open the field from the ‘List Settings’ page, and you will find it in the field settings URL, In the following format (see the value for the parameter ‘Field’ is the internal name – field_1 on this case):
https://tenant.sharepoint.com/sites/site/_layouts/15/FldEdit.aspx?List=%7B9A5C25D6%2D6190%2D4376%2DB9B3%2D4E9AE3A14FAD%7D&Field=field_1
This is amazing. Exactly the issue I was having. Incredibly helpful, even for me, a JSON illiterate.
Hi Kate,
Thanks for your feedback!

Can you confirm that it is still working for you? I have set it up – everything was working fine. But now i cannot filter on “FirstChar” anymore.
Also not on a new site i created. It can only select “Title” – but the field is populated with the first Char.
Interesting is – that it still works on the old site. As long as i do not change it to anything else.
It is an awesome solution – i hope MS did not change anything to stop functioning.
Hi Stephan,
I have just recreated and it is working fine, on a brand new site.
Have you added all needed fields to the views you are using?
The view was it – as i wanted to go with the “default” view i hide the “FirstChar” Field as i thought it would work even without it.
Changed it back and it works.
But also a solution – use a view that has the “firstchar” and change afterwards. Still working.
Thanks a lot for your help
No worries Stephan,
Great it is sorted now

Hi Michael,
This is great, already in production!. The team loves ease of use.
A question, is there any way to reduce the amount of white space between the two web parts on the page?
Regards,
Stephen M
Hi Stephen,
Great to know

The smaller space I could make for this page was by setting the filter WebPart size to Autosize on its settings…
Hi! Many thanks for the article, it worked as a charm.
However, when i tried replicating this for some other columns I created, the Dynamic Filtering does not show all the columns on the Glossary terms list. Did you face such an issue?
Hi Teo,
What is the type of column you are missing in the filter? Not all field types are supported as a filter…
Also, check if the column was added to the filtered view…
Is there a way in the “Format View” to add another field such as Detailed Definition below the Definition field? I tried putting in the following but then I only get the acronym and not the Definition or Detailed Definiton.
“children”: [
{
“elmType”: “span”,
“txtContent”: “[$Definition]”,
“txtContent”: “[$Detailed_x0020_Definiton]”
}
]
Hi Robyn,
Yes you can add it but you would need to create separate child elements elements, for example (see your fields in the bottom):
{
"$schema": "https://developer.microsoft.com/json-schemas/sp/view-formatting.schema.json",
"hideListHeader": true,
"hideSelection": true,
"rowFormatter": {
"elmType": "div",
"style": {
"display": "flex",
"flex-direction": "column",
"align-items": "flex-start"
},
"children": [
{
"elmType": "div",
"attributes": {
"class": "ms-bgColor-themePrimary ms-borderColor-themeDark ms-fontColor-white ms-fontSize-16"
},
"style": {
"border-width": "2px",
"border-style": "solid",
"width": "95%",
"padding": "4px"
},
"children": [
{
"elmType": "span",
"txtContent": "[$Title]"
}
]
},
{
"elmType": "div",
"attributes": {
"class": "ms-borderColor-themeDark ms-fontSize-12"
},
"style": {
"padding-left": "40px",
"width": "95%",
"border-width": "2px",
"border-style": "solid",
"padding": "4px",
"border-top-width": "0",
"margin-bottom": "20px",
"display":"flex",
"flex-direction":"row"
},
"children": [
{
"elmType": "span",
"txtContent": "=[$Definition]"
},
{
"elmType": "span",
"txtContent": "=[$Detailed_x0020_Definiton]"
}
]
}
]
}
}
Hey Michel,
Is there a way to add extra wording in the ‘title’ field so that you can have other words to use rather than the A-Z? I tried with the JSON format you provided but the words are all squished in the gallery view.
Thanks
Erin
Hi there!
Very helpful article 🙂 Thanks.
I do find myself needing help with something though. I did exactly everything as described but for some reason the Json formatting doesn’t recognise the “Description” column. I tried everything from changing the name to editing it in the Json but it keeps only showing me the title. The space for the description stays empty. Any idea what might be the issue? 🙂
Thanks in advance!
Hello…
Are you using the correct internal name for the Description column?
Do you want to share your code? Maybe I can spot the issue